
One misclick. One deleted record. One frustrated user.
The Confirm function in Power Apps prevents exactly this scenario.
This simple yet powerful function displays a professional dialog box that asks users to confirm critical actions before proceeding. It’s easy to implement, fully customizable, and works in both canvas and model-driven apps.
In this guide, you’ll learn how to use the Confirm function to prevent accidental deletions, improve user confidence, and build more professional Power Apps—all in just a few minutes.
What Is the Confirm Function?
The Confirm function displays a dialog box on top of the current screen with two buttons: a confirm button and a cancel button. The user must choose one of the buttons before the dialog is dismissed.
In model-driven apps, the default buttons are localized versions of “OK” and “Cancel.”
In canvas apps (with modern controls enabled), the function uses the Fluent dialog and defaults to “Confirm” and “Cancel.”
The function returns:
trueif the user selects the confirm buttonfalseif the user selects the cancel buttonblank(in canvas apps) if the user dismisses the dialog without selecting a button (e.g., pressing Esc or clicking outside the dialog)
Key Features
- Modal behavior: The dialog blocks other interactions until the user responds.
- Customizable: You can customize the title, subtitle, message, and button labels.
- Localized: Default button labels are automatically localized based on the user’s language.
- Simple return value: Returns a Boolean (
trueorfalse), making it easy to use in conditional logic.
Why the Confirm Function Matters
In enterprise apps, users often perform critical actions like:
- Deleting records
- Submitting forms
- Approving requests
- Resetting data
Without confirmation, a single misclick can lead to data loss, workflow disruption, or user frustration. The Confirm function adds a safety layer that:
- Prevents accidental actions
- Improves user confidence
- Reduces support tickets
- Enhances app professionalism
Real-Life Business Use Cases
1. HR Onboarding: Confirm Before Deleting a Candidate
An HR team uses a canvas app to manage candidate profiles. Before deleting a candidate record, the app prompts the user to confirm the action.
If(
    Confirm(
        "Are you sure you want to delete this candidate?",
        {
            Title: "Delete Candidate",
            Subtitle: "This action cannot be undone.",
            ConfirmButton: "Delete",
            CancelButton: "Cancel"
        }
    ),
    Remove(Candidates, Gallery1.Selected);
    Notify("Candidate deleted.", NotificationType.Success)
)
This prevents accidental deletions and gives the user a moment to reconsider.
2. IT Asset Management: Confirm Before Submitting a Request
An IT asset request app asks users to confirm before submitting a request for new hardware.
If(
    Confirm(
        "Do you want to submit this request?",
        { Title: "Submit Request" }
    ),
    SubmitForm(AssetRequestForm);
    Notify("Request submitted successfully.", NotificationType.Success)
)
This ensures users don’t accidentally submit incomplete or incorrect requests.
3. Expense Approval: Confirm Before Approving High-Value Expenses
A manager uses a model-driven app to approve expenses. For expenses over $5,000, the app displays a confirmation dialog.
If(
    ThisItem.Amount > 5000,
    If(
        Confirm(
            "This expense is over $5,000. Are you sure you want to approve it?",
            { Title: "High-Value Approval" }
        ),
        Patch(Expenses, ThisItem, { Status: "Approved" })
    ),
    Patch(Expenses, ThisItem, { Status: "Approved" })
)
This adds an extra layer of scrutiny for high-value transactions.
4. Document Management: Confirm Before Archiving Documents
A document management app asks users to confirm before archiving a document.
If(
    Confirm(
        "Are you sure you want to archive this document?",
        {
            Title: "Archive Document",
            ConfirmButton: "Archive",
            CancelButton: "Cancel"
        }
    ),
    Patch(Documents, Gallery1.Selected, { Status: "Archived" });
    Notify("Document archived.", NotificationType.Success)
)
This prevents users from accidentally archiving active documents.
How to Use the Confirm Function: Step-by-Step
Prerequisites
- A Power Apps environment
- Basic understanding of Power Fx formulas
- For canvas apps: Modern controls must be enabled (otherwise, the native browser dialog appears)
- For canvas apps: Power Apps authoring version 3.26022.5 or later
Step 1: Identify the Action That Needs Confirmation
Determine which user actions are critical or irreversible. Common examples:
- Deleting records
- Submitting forms
- Approving/rejecting requests
- Resetting data
Step 2: Add the Confirm Function to the Control
Open the control (e.g., a button) and add the Confirm function to the OnSelect property.
Basic syntax:
Confirm( "Your message here" )Example:
If(
    Confirm("Are you sure?"),
    Remove(DataSource, ThisItem)
)
Step 3: Customize the Dialog (Optional)
Use the OptionsRecord parameter to customize the dialog.
Available options:
| Options | Description |
|---|---|
| Title | The text to display as the dialog title (larger, bolder font) |
| Subtitle | The text to display between the title and message |
| ConfirmButton | Custom text for the confirm button |
| CancelButton | Custom text for the cancel button |
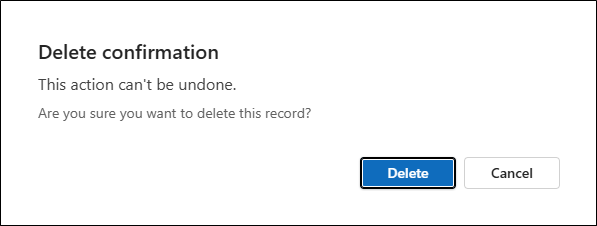
Example with customization:
If(
    Confirm(
        "Are you sure you want to delete this record?",
        {
            Title: "Delete Confirmation",
            Subtitle: "This action cannot be undone.",
            ConfirmButton: "Delete",
            CancelButton: "Cancel"
        }
    ),
    Remove(DataSource, ThisItem);
    Notify("Record deleted.", NotificationType.Success)
)
Step 4: Handle the Return Value
The Confirm function returns:
trueif the user selects the confirm buttonfalseif the user selects the cancel buttonblank(in canvas apps) if the user dismisses the dialog
You can store the result in a variable for use in multiple operations:
Set(
    varConfirmed,
    Confirm("Do you want to proceed?")
);

If(
    varConfirmed,
    Notify("Processing...", NotificationType.Information);
    /* Additional operations */,
    Notify("Operation canceled.", NotificationType.Warning)
)
Step 5: Test the Dialog
- Save and publish your app.
- Test the action that triggers the Confirm function.
- Verify that the dialog appears with the correct message and buttons.
- Test both the confirm and cancel paths.
- Test dismissing the dialog (e.g., pressing Esc) to ensure the app handles it gracefully.
Limitations and Gotchas
1. Modern Controls Required (Canvas Apps)
In canvas apps, the Confirm function uses the Fluent dialog only if modern controls are enabled. If modern controls are not enabled, the native browser dialog appears, which may not support all customization options.
How to enable modern controls:
- Go to Settings > Updates> New> Enable Modern controls and themes
2. Two Buttons Only
The Confirm function supports exactly two options: confirm and cancel. You cannot add a third button or more options.
Workaround: For scenarios requiring multiple choices, use a custom screen with multiple buttons or a dropdown control.
3. Cannot Hide the Cancel Button
The current design always shows both the confirm and cancel buttons. Users must have the ability to dismiss or cancel the dialog.
4. Modal Behavior
The Confirm function displays as a modal dialog that blocks other interactions until the user responds. This is by design, but it means users cannot interact with other parts of the app while the dialog is open.
5. Dismissal Behavior in Canvas Apps
In canvas apps, if the user dismisses the dialog without selecting a button (e.g., pressing Esc or clicking outside the dialog), the function returns blank. Make sure your logic handles this scenario.
Example:
If(
    Confirm("Are you sure?") = true,
    Remove(DataSource, ThisItem)
)
This ensures the removal only happens if the user explicitly selects the confirm button.
6. Localization
Default button labels are automatically localized based on the user’s language. If you provide custom button labels, you are responsible for localization.
Advanced Examples
Example 1: Confirm Before Saving a Form
// Save button OnSelect
If(
    Confirm(
        "Do you want to save these changes?",
        { Title: "Save Changes" }
    ),
    SubmitForm(EditForm1);
    ResetForm(EditForm1);
    Notify("Changes saved successfully.", NotificationType.Success)
)
Example 2: Confirm with Full Customization
If(
    Confirm(
        "This is the main message that describes what the user needs to confirm.",
        {
            Title: "Action Required",
            Subtitle: "Please choose one of the options below.",
            ConfirmButton: "Yes, proceed",
            CancelButton: "No, cancel"
        }
    ),
    Notify("User confirmed!", NotificationType.Success),
    Notify("User canceled.", NotificationType.Warning)
)
Example 3: Capture User Preference
Set(
    FavColor,
    If(
        Confirm(
            "What is your favorite color?",
            { ConfirmButton: "Red", CancelButton: "Green" }
        ),
        "Red",
        "Green"
    )
)
This uses custom button labels to capture a simple preference and stores the result in a global variable.
Example 4: Modal Message Without Checking Return Value
Confirm("There was a problem, please review your order.")This displays a modal message that the user must acknowledge before continuing. The return value isn’t checked.
| Feature | Confirm | Notify |
|---|---|---|
| Modal | Yes (blocks interaction) | No (non-modal banner) |
| User action required | Yes (must select a button) | No (auto-dismisses) |
| Return value | Boolean (true/false) | None |
| Use case | Critical actions requiring confirmation | Informational messages |
Use Confirm when:
- The action is irreversible (e.g., delete, submit)
- You need user confirmation before proceeding
- You need to capture a Boolean decision
Use Notify when:
- You want to display informational messages
- The message doesn’t require user action
- You want a non-intrusive notification
How to Try It Yourself
For Canvas Apps
- Open Power Apps Studio.
- Verify your authoring version: Go to Settings > Support > About and ensure you’re using version 3.26022.5 or later.
- Create a new canvas app or open an existing one.
- Enable modern controls: Settings > Updates > New> Enable Modern controls and themes.
- Add a button to your screen.
- Set the button’s OnSelect property to:
If(
    Confirm(
        "Are you sure you want to proceed?",
        {
            Title: "Confirmation",
            ConfirmButton: "Yes",
            CancelButton: "No"
        }
    ),
    Notify("You confirmed!", NotificationType.Success),
    Notify("You canceled.", NotificationType.Warning)
)- Save and preview the app.
- Click the button and test the dialog.
Troubleshooting: If the Confirm function doesn’t work or shows a basic browser dialog, verify that:
- Your authoring version is 3.26022.5 or later
- Modern controls are enabled
- You’re using the correct syntax
For Model-Driven Apps
- Open your model-driven app in the app designer.
- Navigate to the form or command bar where you want to add the confirmation.
- Add a custom button or command.
- In the command’s action, use the Confirm function:
If(
    Confirm("Are you sure?", { Title: "Delete Confirmation" }),
    Remove(ThisItem)
) - Save and publish the app.
- Test the command to verify the dialog appears.
Best Practices
- Use clear, concise messages: Avoid jargon. Explain what will happen if the user confirms.
- Customize button labels: Use action-oriented labels like “Delete,” “Submit,” or “Approve” instead of generic “OK.”
- Add a title and subtitle: Provide context and clarity.
- Handle dismissal gracefully: In canvas apps, account for the
blankreturn value. - Don’t overuse: Only use Confirm for critical actions. Overusing it can frustrate users.
- Test localization: If your app supports multiple languages, test the default button labels in each language.
- Keep Power Apps Updated: Ensure you’re using Power Apps authoring version 3.26022.5 or later to access all Confirm function features and customization options.
Conclusion
The Confirm function is a simple yet powerful tool for building better user experiences in Power Apps. It adds a safety layer that prevents accidental actions, improves user confidence, and enhances app professionalism.
Whether you’re building a canvas app or a model-driven app, the Confirm function is easy to implement and highly customizable. Use it wisely, and your users will thank you.
Microsoft Learn URLs
- Confirm function reference for Power Fx – Power Platform | Microsoft Learn
- Overview of modern controls and theming in canvas apps – Power Apps | Microsoft Learn
- Notify function – Power Platform | Microsoft Learn
Discover more from Power Solution
Subscribe to get the latest posts sent to your email.